
I have never really had great success with night photography. Often my images are comprised excessively of bright lights and blown out detail. Nothing I was really ready to write home about. It was on a lark I thought about capturing a series of images to create an HDR image and see where that would take me.
Even the best sensor has difficulty sorting out high contrast environments, either under exposing shaded areas or washing out brightly lit scenes in favor of the shadows. Lightroom and Photoshop have their ways of increasing exposure in the shadows, or subduing overexposed highlights. In many prosumer and pro-grade cameras there is D-lighting settings to help out. Nikon cameras have a feature to do HDR in-camera, but not with RAW files, Jpg only. Even then, these assets go only so far.
HDR or High Dynamic Range is a method offered up by many photo editing softwares to use three or more images to create a single image with moderated highs and lows, creating an image with better lighting.
The title image I took while in London for Christmas. When I captured the images, I was growing increasingly frustrated with my night shots not being as clear as I wanted, being too dark, too light or just too high contrast. It was in a moment of exasperation I thought about HDR. Then I forgot all about it. I had several other images of more conventional photography to keep me happy and I brushed off my failure in night imagery as a non starter.
It was a few days ago, as I was organizing my archive drives and field notes, that I came across my little write up about several images, their exposures and a scribble of “HDR” in the margin.


Lightroom CC has become more and more my goto program for image editing, especially since I made the leap from APS-C to Full Frame with a purchase of Nikon’s D850 DSLR. I have done some wonderfully detailed photography and panoramas. The process is extremely easy in Lightroom; select the series of images you want to merge, right click, select “Photo Merge” and “HDR”.
I had taken 7 images, but I decided on the three highest exposures just as a test. Later when I attempted an HDR with all the images, it came out less than stellar and I returned to my original 3.
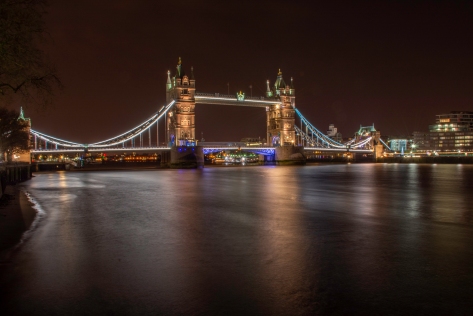
It may not look great, but this actually covers a very wide dynamic range. There are subdued bright lights and muted shadows ready for additional contrast, brightness, clarity and de-hazing. There is an additional benefit of Photoshop using the least noisy parts of the images to create a much cleaner final capture.
De-hazing and Clarity have become two of my favorite tools in Lightroom.
Clarity benefits an image in improving edge contrast by compressing dynamic range between color and light variations. It is a very intelligent tool and, for many of my images, has become a more intelligent means of increasing acuity without running for the sharpening filter and all of its often painful drawbacks (noise, halos, etc..
Dehaze is an all together different model, but helps dramatically with an images’ acuity. According to Adobe “the Dehaze technology is based on a physical model of how light is transmitted, and it tries to estimate light that is lost due to absorption and scattering through the atmosphere”. For you and I, anything in an environment which might interfere with the transmission of light is negated by the Dehaze tool.
You can also use Clarity and Dehaze in Photoshop CC using “Camera RAW” under the filter menu. Be sure you have the layer selected before you access Camera RAW or you might end up editing the wrong layer.
Dehaze and Clarity do have a few drawbacks, mostly in overly saturated colors, such as the sky, which are easily dealt with using a graduated filter to desaturate the affected area.

As you can see, the image is much easier to manipulate and edit. My barometer for this image was the small shield in the center of the span between the towers. As long as that was legible, everything else seemed to fall into place
When I was capturing these images for my project, I used a zoom with a bottom end 18mm and I knew there was going to be some cropping involved. In Photoshop, I dealt with a few issues and lens blooms from the harsh light, then darkened the sky a bit more with a graduated fill, dark to transparent.
All in all, this took me in the neighborhood of an hour to work out how to proceed. Further explorations in night photography will help me increase my understanding of this skill set, as well as finding more wonderful images to capture.
I have been honing my skill set in creating more realistic lighting and color effects, forgoing excessive vibrancy in favor of subtle colors. One of the great things about modern photography has a person revisiting older images as their skill set improves. I am no stranger to admitting I have a lot to learn and mistakes to make. For now, this one isn’t one of them.
Have a great one…
