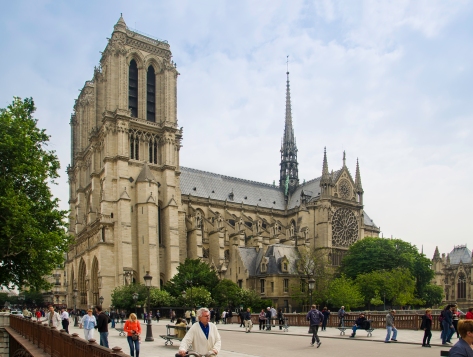
Notre Dame Cathedral, Paris France.
There are a thousand reasons why a picture doesn’t come out right: bad weather, poor lighting, light temperature at the wrong setting. Camera settings can be a major culprit when dealing with even a modest prosumer camera.
Please note: I hope this post to be informative and I use several screen captures and the resolution of the images has been left at a relatively high dpi. I hope this will add to the post, but may require a bit of patience when loading the galleries.
Wow did I screw that one up. I wasn’t in much of a position to wait for a better day to reshoot this image, but that didn’t mean I had to settle for its condition either. Let’s start out with what the original image looked like.
If I knew how bad this was, I might have deleted it from my camera and have another go at it, but I was under a time crunch and had overestimated myself and neglected the settings on my camera. Off the top of my head, I had the exposure set to intentionally underexpose for a previous shot. The temperature setting was way off. My lens was backed off to 18mm. I normally would have changed out the lens to avoid the bowing effect you see here. When I opened the raw file, I could have kicked myself. But it’s a very clear shot with a good, sharp focus.
I opened the shot in Lightroom 4 and began by fixing the bowing effect by scaling it down to avoid cutting off the top of the cathedral towers and allowing for a bit of wiggle room for cropping.
Once this was completed, I began to work with the overall colors by adjusting the exposure, vibrancy, contrast and then touched a bit on the sharpness of the image. The gentleman in the foreground pushing his bicycle made for a good reference as I had a fair idea of his skin tone.
Now for the hazy sky. This was a two fold effort. Step one involved opening the file in CS6 then returning to Lightroom to add a graduated filter for the sky. The graduated filter was dropped about one f-stop and the color temperature was lowered to create the blue sky. I then imported this image into CS6.
In CS6, the first color corrected image was made into the background layer, and the blued graduated filter was copied onto the image as a second layer. That layer was then turned into a mask. Using the brush and my tablet, I slowly worked around the cathedral to bring the sky forward and leave the cathedral unaffected.
Once this was completed, I flattened the image and saved it. A small amount of final touching up in Lightroom and I had an image worth keeping.
Some people can point out rightly that I could have used the quick selection tool and refined the edges, which is true. but I risked loosing some of the finer points on the cathedral through error and this method gave me a greater amount of control of the image. It is also very easy to correct mistakes when my tablet pen wanders too far into areas that needed to be left alone.
 As I write this, I’m in “the 24 hr” period, where I walk away from a image for a day or so. Later when I have some distance from the image, I will open it up again and decide if it is finished, or if there other details that need to be addressed. As it stands now, I have put in about 2 hours of time to get it to the point at the top of the post. I will let you know if it requires a bit more effort.
The 24 Hour Period Follow Up
Overall, the image looks good, but I did zoom in on the man with the bicycle and decided it was a bit overexposed and dropped it by half an f-stop. I then looked at the foliage and the cathedral itself. The effect was actually minimal. I soft proofed it in CS6, taking note that when I finally make a hard copy, I’ll need to boost the brightness by about fifteen percent to compensate for paper color. Saved to both internal hard disk and the external backup. Feeling better now.
Everyone Have a Great Day.


One thought on “Saving a Photo from the delete key”